Automatically Find The Best Image Compression
Recently I was tweaking the default quality values used to compress images on one of our sites. The quality value is a number between 0 and 100. 100 produces a large file size and has high quality. 0 gives very low file sizes but images which are a blurry mess. The trick is finding the sweet spot so the image has the smallest file size while still looking good.
I was doing this by hand, tweak the value, refresh, ask myself if the image still looks good, repeat. While this worked it became clear that the optimal value for one image could be quite different for another. Additionally it was different between JPEG, WEBP and AVIF for the same image. I had to settle for the lowest common denominator to make all the images look good, knowing some were larger than required. I was left with the thought, as I so often am: Can we automate this?
Automate All The Things!
I am always looking to automate. Computers don't make mistakes, get bored or need to sleep. They just need an algorithm to execute:
- Compress an image with a given quality
- Check if it looks crappy
- Adjust the quality value up or down
- GOTO 1
Simple enough, except step 2. Computers may not need to sleep but they also don't have opinions on how crappy images look.. Or so I thought. Upon googling the problem I found that there are a number of algorithms which can evaluate the similarity of two images. aHash, dHash and pHash to name a few. The one that caught my eye was DSSIM
This tool computes (dis)similarity between two or more PNG &/or JPEG images using an algorithm approximating human vision. Comparison is done using a variant of the SSIM algorithm.
The advantage this approach had over others I had found was it takes into account human perception. Our eyes and brains do a lot of filling in missing details.
How Different Is Too Different?
The DSSIM tool accepts two images, in our case the original and the compressed, and returns a number between 0 and ∞. 0 meaning both images are identical. The further you get from 0 the greater the difference. Sooo how much difference is too much? We need to compare how the difference changes with respect to the quality value.
Well, over 100,000 compressed images and many compute hours later we get this:
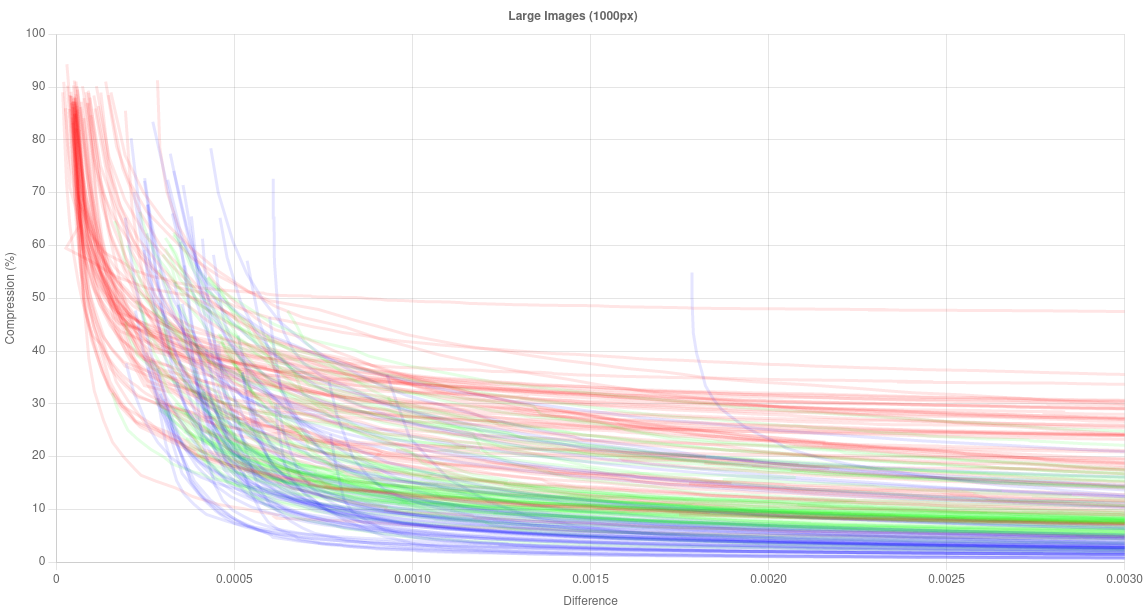
The x-axis is the difference returned from DSSIM. The y-axis is how much smaller the image became compared to the original.
The colours represent the encoding:
- red => JPEG
- green => WEBP
- blue => AVIF
This plot shows the results for larger images. I ran the same analysis for medium, small and thumbnail sized images. The results are much the same just less pronounced so I will focus only on the larger images.
Looking at the plot we can see that a DSSIM value higher than about 0.0007 doesn't result in much smaller files. That sets the upper bound but do images that are "0.0007 different" still look good?
 |
 |
 |
 |
 |
 |
 |
|
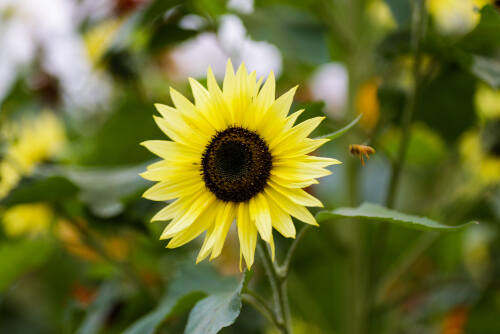
| DSSIM | 0.0000 (original) | 0.0005 | 0.0010 | 0.0015 | 0.0020 | 0.0025 | 0.0030 |
| Quality | 100 | 83 | 71 | 60 | 49 | 41 | 36 |
| File size | 179.2 kB | 44.4 kB | 36.1 kB | 31.1 kB | 28.1 kB | 26.4 kB | 24.8 kB |
Photo by Harrison Mitchell on Unsplash
To my eyes the first 3 are identical. Beyond that you can start to see some blockiness if you look closely at the petals. While these artifacts are subtle the file size gains have already plateaued so any further compression isn't worth it:
- 0.0000 => 0.0010 saves 143.1 kB (80%)
- 0.0010 => 0.0020 saves 8.0 kB (4.4%)
- 0.0020 => 0.0030 saves 3.3 kB (1.8%)
Open Source
The code to do this is open source and can be found on GitHub:
It's pretty simple to use:
$quality = ImageCompressionFinder::make()

    ->run('path/to/image.jpg');
By default it uses a max difference value of 0.001. This can easily be customised:
$quality = ImageCompressionFinder::make()

    ->maxDifference(0.002)

    ->run('path/to/image.jpg');
See GitHub for all the details.
Size Matters
I would recommend running the compression finder on images which have been resized to the dimensions they will be displayed on screen. There are two reasons for this:
Performance
The sunflower image above (500x334) took ~0.6s to process. The full size version (3408x2272) took ~10s. That's using JPEG compression.
Using the AVIF encoding: 500x334 => ~3s and 3408x2272 => 77s. AVIF is well known for being slow to compress but it is made worse by DSSIM only being able to compare JPEGs so AVIFs have to be encoded again back to JPEG for comparison.
YMMV of course. It depends on which image processor your using (imagick in my case), hardware, image complexity etc. Either way I would recommend running this as an asynchronous task or as part of a build pipeline.
Accuracy
This is much less important but larger images can take a little more compression before artifacts start appearing.
Epilogue
Some bonus stuff I learned on this journey:
- Encoding a JPEG to WEBP at 100 quality produces images which are considerably larger than the original. I removed all 100 quality data points for this reason.
- The higher the compression the faster encoding is
- All the data is here if you want to analyse it yourself.